 |
|
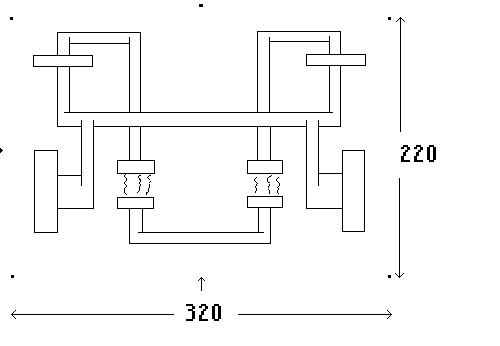
This is a tutorial for webbers who love to do table art and are ready to learn some advanced grad-tabling. It is also a tutorial dedicated to what is referred to by many different names -- geometics, geo-technic, tubular, techno-tronics, etc. I have been often asked how I have done the various Tinged Tronic sigs that I had online. So, I decided to write a detailed tutorial to answer those inquiries. Learning this kind of tabling IS complicated. Most of you will need to print lots of this out and study. I designed this tute for just that. At the bottom of every page in this tutorial, you will see a .txt file. I always found it so handy whenever I was trying to learn something new to print out the tutes. I did the .txt of each page so you will not chew up all your printer ink! Also, I did not use relative URLs, incase you would like to print any of this tute's images for reference purposes. For you folks new to Web-TV grad tabling, I would like to suggest that you take part in the various newsgroups dedicated to tabling such as---Joe's Tables & Scopes, and follow a group dedicated to teaching tabling---Tandem Tooters. These folks will get you started with learning regular tables first and then get you along the way to more advanced. This tutorial, as I said, is for those that have advanced. OK! Let's start! There are many great tablers on webbie. Each one has their own way of doing their art. This is MY way. I am a grapher. I am a planner. I know some artists can just sit in front of their edit boxes and go away at it. I never could. I use regular store bought graph paper. Web-TV resolution is 577 pixels wide. Buy graph paper that have at least that number of graphs per width of sheets. Don't buy too small. Your eyes will fall out. I use a good dark sharp pencil, a few colored pencils, a ruler and an eraser (often). With a sharp pencil in hand, you are ready to draw out a nice techno design. Think like a mad plumber. Pipes and pipe fittings, welded every which way. In Tinged Tronics, I only used four gradangles: 0, -0, 90 and -90. When doing these larger techno designs, these 4 angles give the cleanest look. Once you master this, you are ready to get into maybe doing some nice fine line art. There you can get into other odd angles. With your ruler, draw a box on your graph paper that will be the overall size that you want your piece to be. Most of my Tronics were around 350 pixels wide and about 250 pixels high, if this can give you a base to start that box. I leave 20 pixel space on all sides for arrows and other kind of notations. Remember, the bigger, the bigger the file size. These babies can add up and really strain a LBB. NOW, this is important. When you do your design, check and double check your counting. NOTHING is more frustrating to be off 5 or 10 pixels after you are into your coding!! I have graphed out a work that this tutorial will follow. My scanner is not the best and it refused to pick up the graph lines, but you get the idea. But, it IS done on graph paper and this is what it looks like after my first draw. Make note of how I marked my 4 corners and my halfway counts with the dots. AND, on my graph, I double checked all my counts! |
 |